[Hero Wars Guide]Titan Artifact Sphere
![[Hero Wars Guide]Titan Artifact Sphere](https://h-w.fun/en/wp-content/uploads/sites/2/2025/08/Hero-Wars-Guide-Titan-Artifact-Sphere.png)
Contents
Item Guide
- Also known as the Black Sphere.
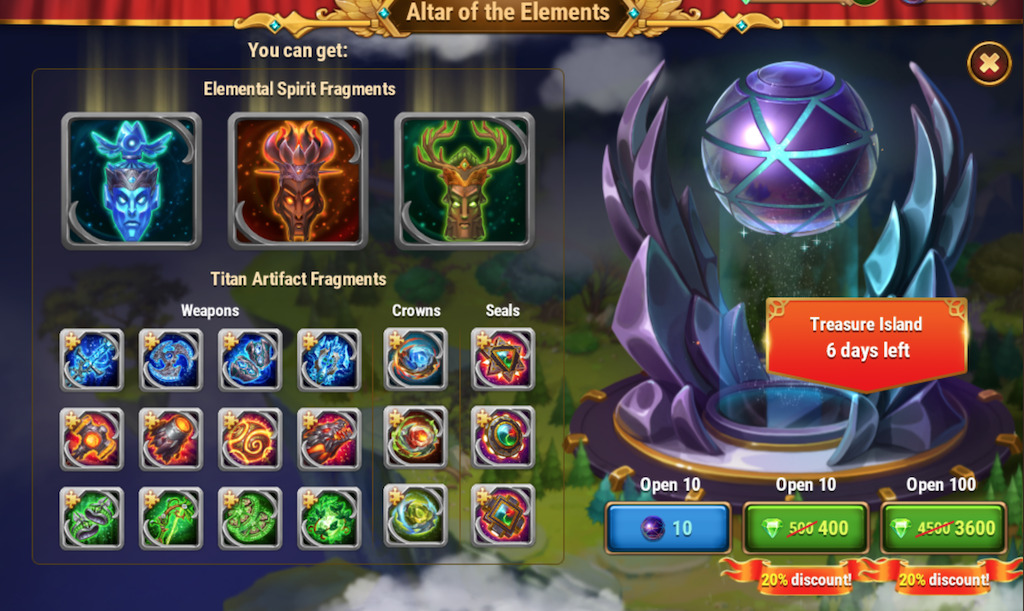
- Used to spin the Altar of the Elements.
- This item has no BLP (Bad Luck Protection). Using it also comes with certain disadvantages when it comes to guaranteed totems.

Differences from Using Emeralds
- Emerald spins include BLP, meaning you’re guaranteed at least one totem after spending a certain amount of emeralds.
- Black Sphere spins have no BLP. As a result, outcomes vary wildly — some players get two totems from just 1,000 spheres, while others spend 10,000 and receive nothing.
- The base totem drop rate is roughly the same as with emerald spins, but the lack of BLP dramatically changes results.
Cases Where Using the Black Sphere Is Disadvantageous
- Totems obtained from Black Spheres do count toward your guaranteed totem progress.
- Example: The first guaranteed totem requires 4,500 emeralds. If you get one from a Black Sphere first, the requirement jumps to 45,000 emeralds.
- Example: A player with 30 totems who gains three more via Black Spheres will see the cost of their next guaranteed totem rise by 900,000 emeralds (3 × 300,000).
- Heavy Black Sphere users can prepare Elemental Spirit Summoning Sphere to trigger guaranteed totems intentionally, but this is irrelevant if you never use Emeralds for the altar.
- New player warning: The first two totems require very few emeralds due to BLP. Using Black Spheres early wastes this benefit.
Free-to-Play (F2P) Totem Acquisition Variance
- Whether or not BLP applies heavily influences drop results, even if the base drop rate stays the same.
- Element assignment also impacts F2P players more, since only the first two totems let you choose the element.
Typical one-year F2P results can range from
- Two totems total
- One Level 1 totem of each element
- A full set of maxed totems for one element
For non-spenders, this remains the most RNG-dependent part of the game.
Note: Paying players also experience drop variance, but over time they typically collect all totems, reducing the long-term impact compared to F2P players.
![[Hero Wars Guide]Guaranteed Totem Drop](https://h-w.fun/en/wp-content/uploads/sites/2/2021/12/Hero-Wars-GuideGuaranteed-Totem-Drop-320x180.jpg)

![[Hero Wars] Araji and Hyperion](https://h-w.fun/en/wp-content/uploads/sites/2/2024/01/Hero-Wars-Araji-and-Hyperion-1200-320x180.jpg)
![[Hero Wars] Get Titan Artifacts](https://h-w.fun/en/wp-content/uploads/sites/2/2022/09/Hero-Wars-Get-Titan-Artifacts-320x180.jpg)
![[HeroWars攻略]炎のトーテム](https://h-w.fun/en/wp-content/uploads/sites/2/2022/09/Hero-Wars-Guide-Fire-Totem-320x180.jpg)
![[Hero Wars Guide] Absolute Spirit Summoning Sphere](https://h-w.fun/en/wp-content/uploads/sites/2/2023/07/Hero-Wars-Guide-Absolute-Spirit-Summoning-Sphere-320x180.jpg)
![[Hero Wars]Elemental Spirit Summoning Sphere](https://h-w.fun/en/wp-content/uploads/sites/2/2021/12/Hero-WarsElemental-Spirit-Summoning-Sphere-320x180.jpg)
![[Hero Wars Guide] Elemental Spirit Fusion](https://h-w.fun/en/wp-content/uploads/sites/2/2025/07/Hero-Wars-Guide-Elemental-Spirit-Fusion_1-320x180.png)
![[Hero Wars Guide] Elemental Spirit Fusion](https://h-w.fun/en/wp-content/uploads/sites/2/2025/07/Hero-Wars-Guide-Elemental-Spirit-Fusion_5-320x180.png)
![[Hero Wars] Upgrade Light Titans](https://h-w.fun/en/wp-content/uploads/sites/2/2023/01/Hero-Wars-Upgrade-Light-Titans-640x360.jpg)
![[Hero Wars Guide] Adventure Chest](https://h-w.fun/en/wp-content/uploads/sites/2/2025/09/Hero-Wars-Guide-Adventure-Chest-640x360.png)
![[Hero Wars Guide] Level Up Pet](https://h-w.fun/en/wp-content/uploads/sites/2/2023/01/Hero-Wars-Guide-Level-Up-Pet-640x360.jpg)

![[Hero Wars Guide]Clash of Worlds](https://h-w.fun/en/wp-content/uploads/sites/2/2022/08/Hero-Wars-Guide-Clash-of-Worlds-320x180.jpeg)
![[Hero Wars Guide]The Great Storm MAP Strategy](https://h-w.fun/en/wp-content/uploads/sites/2/2022/09/Hero-Wars-Guide-The-Great-Storm-MAP-Strategy-320x180.jpg)
![[Hero Wars Guide] Defence Trends Meta Teams](https://h-w.fun/en/wp-content/uploads/sites/2/2023/04/Hero-Wars-Guide-Defence-Trends-Meta-Teams-320x180.png)
![[Hero Wars Guide] Famous Teams for Osh Battle](https://h-w.fun/en/wp-content/uploads/sites/2/2023/12/Hero-Wars-Guide-Famous-Teams-for-Osh-Battle-320x180.png)
![[Hero Wars Guide] Temple Guardians 130](https://h-w.fun/en/wp-content/uploads/sites/2/2024/05/Hero-Wars-Guide-Temple-Guardians-130-320x180.jpg)
![[Hero Wars Guide] Galahads Memories](https://h-w.fun/en/wp-content/uploads/sites/2/2023/12/Hero-Wars-Guide-Galahads-Memories-320x180.jpg)
![[Hero Wars] Cosmic Season](https://h-w.fun/en/wp-content/uploads/sites/2/2021/12/Hero-Wars-Cosmic-Season-320x180.jpg)
![[Hero Wars Guide]Maestro of the Phantom Orchestra](https://h-w.fun/en/wp-content/uploads/sites/2/2024/09/Hero-Wars-Phantom-Orchestra_0-320x180.jpg)
![[Hero Wars] Maestro Boss](https://h-w.fun/en/wp-content/uploads/sites/2/2025/06/Hero-Wars-Maestro-Boss-320x180.jpg)
![[Hero Wars] Aurora vs khark](https://h-w.fun/en/wp-content/uploads/sites/2/2023/04/Hero-Wars-Aurora-vs-khark-320x180.jpg)
![[Hero Wars] Interplanetary Travel](https://h-w.fun/en/wp-content/uploads/sites/2/2023/11/Hero-Wars-Interplanetary-Travel-320x180.jpg)